Contributing to AmberELEC
- Reporting Bugs
- Pre-Release Builds
- Development / PR Builds
- Contributing Code
- Setting up the environment
- Building Your Contribution
- Contributing Community Built Packages
- Docker usage
- Debugging
- Developing Changes to Emulation Station
Reporting Bugs
- Check you are using latest released version, only released versions are supported.
- If you are using a pre-release build, do not open an issue in AmberELEC. Instead, report the findings in the
#pre-release-feedbackchannel on Discord (Under “Community Contribution”). - Before reporting an issue with the pre-release build, try reproducing the issue on the current release. Please mention the results up front when you bring your issue to Discord. For example:
When I try xyz in pre-release build ABC, something bad happens. However, when I try xyz in in the latest release, I do not see this problem. Is this a known issue?. Try and keep comments concise and constructive. - Check the existing issues to see if your bug has already reported. If it has been reported, do not open another bug report. If it is not reported, use a template and fill it out completely. Issues opened without using the templates will be closed.
- Be patient, as we are volunteers and working on the project in our spare time.
Pre-Release Builds
IMPORTANT NOTE: Pre-Release builds are for advanced users to test fixes or explore new functionality.
Builds are released each night when there are new commits to main. Builds are scheduled at 8:00pm UTC, releasing around 8:30 PM UTC. Users should expect issues and have a backup of their configs just in case a reflash is needed, etc. Do not file issues on pre-release builds, use Discord (#pre-release-feedback). See “Reporting Bugs” above.
Finding/Installing Pre-Release Builds
The latest pre-release build can be found on the AmberELEC-pre-release releases page. Builds are installed as normal (using either a .tar or a .img.gz).
Using Pre-Release Builds
Pre-Release builds should operate normally. From the device, you can update to the latest pre-release build by specifying the PRERELEASE channel in Updates & Downloads.
If you would like to switch back to the current release, the RELEASE channel will switch back to a released version.
Development / PR Builds
Dev and PR builds are intended primarily for developers to get the latest changes from dev or a PR before the build hits ‘pre-release’. Use at your own risk.
Finding/Installing Development Builds
-
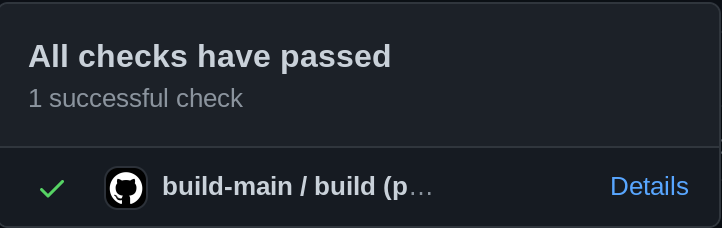
To find the latest development build, click on the ‘green checkbox’(
 ) on the AmberELEC main page. Then click Details.
Ex:
 .
. -
On the following page, find the “Artifacts” link on the upper right. Click and select the zip file for the RG351P or RG351V.
Ex:
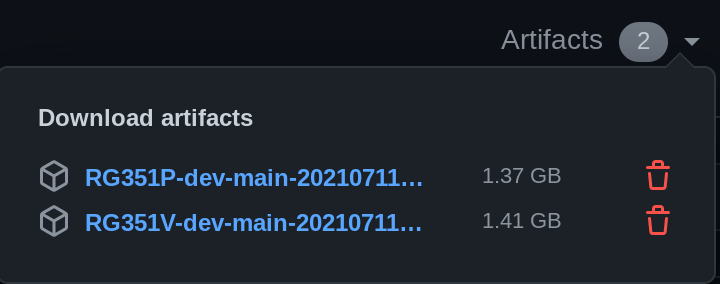 .
.- NOTE: Currently
.zipfiles are provided due to technical limitations with Github Actions. Both the.tarand.img.gzare inside the zip file. In the future, separate zips for .tar and.img.gzmay be provided.
- NOTE: Currently
-
Unzip the zip file and then use
.taror.img.gzinside as normal to update.
Using development builds
- The
versionof a dev build will be encoded in the .tar/img.gz file and shown on the EmulationStation menu as normal. This can help identify if you are on the latest development build - Online updates: All released builds are considered ‘newer’ than dev builds. This means if you do an online update from a dev build, you will go back to the latest release build. NOTE: There is currently no ‘development’ channel to stay up to date with the latest dev builds. One may be implemented in the future.
PR Builds
Pull Request (PR) builds are very similar to development builds and can be used to test PR’s with the following caveats:
- Feedback specific to the PR can be left as comments on the PR itself. Please keep any feedback short and constructive or it may be deleted. If you have the same comment as another user, use a ‘reaction’ on that comment to help keep the comments clean and easy to navigate for the developer and others.
- Build zip only includes the
.tarfile to keep build speed faster. - Builds are found on the ‘Checks’ tab of the PR. Then click on ‘Artifacts’ link in the upper right.
Contributing Code
First, thank you. As a volunteer project, maintaining a project like this can be difficult. Any contributions are greatly appreciated. If you are contributing there are a few guidelines that need to be followed for your contribution to be accepted.
- We recommend that you work in a feature branch in your own fork, and that you submit pull requests of tested changes to the dev branch for integration.
- Code contributions are to be licensed as GPLv2 or later and marked when possible.
- All package contributions must be marked with the appropriate license for the package in package.mk. If the package license is not included in the licenses directory, please include it with your pull request.
Setting up the environment
There is an available virtual machine created by Christian Haitian that’s good do ports for AmberELEC, more info here.
Moreover, in order to locally build AmberELEC from sources it’s possible to use a docker, more info here.
Building Your Contribution
When you are ready to test your package you can use the ‘build’ script located in the scripts folder. If your world environment is not up-to-date, the script will build all of the package dependencies before building the package.
Example:
AmberELEC$ ./scripts/build packages/games/libretro/dosbox-pure
To install the package into the image root, use the ‘install’ command.
Example:
AmberELEC$ ./scripts/install packages/games/libretro/dosbox-pure
Before submitting a contribution it should build and install properly in your test environment.
Contributing Community Built Packages
AmberELEC will have support for a community package repository starting with v1.0.7. Contributing a package is simple, but there are a few requirements. Please note that all packages should be submitted as pull requests to the repository.
Community Catalog Schema
The community catalog is stored in this repository at /metadata/packages.cfg. It is a plain pipe delimited text file which uses the following schema.
{PACKAGE NAME}|{PACKAGE URL}|{SHA256SUM}
Packages must not contain spaces in the package name.
Example Submission
my_application|https://github.com/myaccount/myrepo/releases/download/1/my_application.zip|d06489dcf04c602ddacc6f80b2809e6d25fd6298c461966e666e19d3188e04be
Package Schema
The community repository accepts only .zip files and they are required to conform to the following schema.
| Script | Function | Location |
|---|---|---|
| install.sh | Installing your port or software | Package Root |
| uninstall.sh | Uninstalling your port or software | Package Root |
| hashes | sha256sums of binaries | Package Root |
| system-packagename.png | Image (ports only) | Anywhere |
| system-packagename-thumb.png | Thumbnail (ports only) | Anywhere |
| application data | The application and its data | Anywhere, including external |
The package must unzip to a subdirectory equal to the package’s name in the repository. If the package in the repository is ‘my_application’ then the installation files are expected to be found located at ‘my_application/(un)install.sh’ after extracting.
Example Package
The first package added to the repository may be used as an example to help determine how to develop your package.
| Package | Repository |
|---|---|
| Drastic | https://github.com/351ELEC/packages |
Installing and Uninstalling
Your package is expected to integrate with the rest of the system and require minimal user intervention, unless additional data/packs are required for operation.
- All licenses must be followed. Failure to follow a license will result in being disallowed from contributing to this repository.
- You may pull packages from external sources, as long as they are well supported, hashed, and validated.
- Use well known sources such as GitHub. Do not use forums, etc.
- Include sha256 checksums in the package zip and use them to validate binaries and all external data during installation.
- You are expected to clean up 100% of your package remnants except for user data on uninstall.
- Use the proper tools for integration with the system, such as xmlstarlet to add content to a system or gamelist.xml.
- Use tests to ensure that your install and uninstall do not create errors.
- If it is not your data, do not touch it. Failure to follow this rule will result in being disallowed from contributing to this repository.
- Package all required libraries. If you do not know what libraries you need, do not submit until you do.
- Ensure there is a start script for your application, and that it uses LD_LIBARY_PATH to reference your libraries first.
All packages will be reviewed prior to accepting and merging the request.
Integration
You may use xmlstarlet to add and remove your application from the appropriate system XML files. Here’s an example.
Adding your Application
CFG="/storage/.emulationstation/es_systems.cfg"
xmlstarlet ed --omit-decl --inplace \
        -s '//systemList' -t elem -n 'system' \
        -s '//systemList/system[last()]' -t elem -n 'name' -v 'myapplication'\
        -s '//systemList/system[last()]' -t elem -n 'fullname' -v 'My Application'\
        -s '//systemList/system[last()]' -t elem -n 'path' -v '/storage/roms/myapplication'\
        -s '//systemList/system[last()]' -t elem -n 'manufacturer' -v 'Me'\
        -s '//systemList/system[last()]' -t elem -n 'release' -v '2020'\
        -s '//systemList/system[last()]' -t elem -n 'hardware' -v 'portable'\
        -s '//systemList/system[last()]' -t elem -n 'extension' -v '.zip .ZIP .pak .PAK'\
        -s '//systemList/system[last()]' -t elem -n 'command' -v "/emuelec/scripts/$START_SCRIPT %ROM%"\
        -s '//systemList/system[last()]' -t elem -n 'platform' -v 'myplatform'\
        -s '//systemList/system[last()]' -t elem -n 'theme' -v 'myapplication'\
        $CFG
Removing your Application
CFG="/storage/.emulationstation/es_systems.cfg"
xmlstarlet ed -L -P -d "/systemList/system[name='myapplication']" $CFG
Docker usage
Building with Docker simplifies the build process as any dependencies are contained within the Docker image. In order to make docker builds easy to use and keep automation in the project unified, I’ve updated the Makefile to help building via docker. This would mean more or less any system with make installed (technically gmake) and Docker along with a few system utilities (id, pwd) would be able to build AmberELEC.
All make commands are available via docker, by prepending docker-. For example, make RG351V becomes make docker-RG351V and make clean becomes make docker-clean. This enables existing and new commands added to the Makefile to be easily used via docker without affecting existing behavior. Credit to the batocera team for the idea of how this could work: (https://github.com/batocera-linux/batocera.linux/pull/1434/files) and @dhwz for pointing out their Docker integration.
New docker make commands:
make docker-image-build- Builds the docker image based on the Dockerfile. This is not required unless changes are needed locally.make docker-image-pull- Pulls docker image from dockerhub. This will update to the latest image and replace any locally built changes to the docker file.
Example building with docker:
git clone https://github.com/AmberELEC/AmberELEC.git AmberELEC

cd AmberELEC
make docker-image-pull  # not required - but will ensure the latest image is pulled in
make docker-clean
make docker-world
Notes on Docker installation
- It is recommended to use the Docker installation process from Docker itself as opposed to distribution specific process (for example, don’t use:
apt install docker.io). You should use: https://docs.docker.com/engine/install/. This is mainly to avoid really old versions of docker (ubuntu 16.04/18.04) and WSL2 doesn’t work properly withdocker.ioeven in Ubuntu 20.04 - On WSL2 the command
sudo service docker startis needed before the build command, for examplemake docker-RG351P.
Thoughts on caching the toolchain (future)
By standardizing the build environment into Docker, it would be possible to cache/share build artifacts (such as the toolchain) in the future to improve build times, but this is not currently done. I’m not sure the exact right way to do this, so excluding this change for now as (I think) it would require some updates to the Makefile to do right.
One idea would be if we built the toolchain in the docker build and then stored the toolchain in another standard directory (/opt/toolchain/aarch64, etc), the Makefile could be updated to populate the build* directories from the /opt/toolchain if the toolchain didn’t exist, etc. I’m also not sure if only the toolchain directory is needed to be saved or the other dependent packages too (FYI: I saw some errors with libltdl which I think is part of libtool that indicate just the toolchain directory may not be enough.)
Debugging
The build scripts automatically strip debug symbols from binaries before installation. If you need to debug on device, you can use the DEBUG environment variable to list the packages, comma separated, that you’d like to debug. You can also set the variable to all or yes, but it is strongly recommended that you do not do this*
For example, if I wanted to debug the packages mupenplussa-core and mupenplussa-ui-console while building an RG351V image, I’d use the command DEBUG=mupenplussa-core,mupenplussa-ui-console make docker-RG351V.
Developing Changes to Emulation Station
Emulation Station (ES) is a super-flexible UI used by many projects for embedded devices. However, since it is written in C++, it is often painful for many UI developers. Below are some tips on how to make developing changes to EmulationStation a bit easier.
Build only the ES binary and copy it to the device
This might seem obvious, but as emulationstation is just an executable. You can build it, copy it to the AmberELEC device and run it without making a full AmberELEC build which saves a lot of time.
- clone locally -
git clone --recursive https://github.com/AmberELEC/emulationstation. It is suggested to put inside your AmberELEC/AmberELEC git clone so it will be available to docker builds. - update AmberELEC
ui/AmberELEC-emulationstation/package.mkto point to your clone.- You can pretty much just uncomment and follow the instructions here: https://github.com/AmberELEC/AmberELEC/blob/dev/packages/ui/AmberELEC-emulationstation/package.mk#L20
- (recommended) if you checked out AmberELEC-emulationstation into your AmberELEC folder and use docker to build. You can build as follows. NOTE that removing the source is needed to ensure the git source is properly re-copied:
rm -rf ./sources/AmberELEC-emulationstation/ && DOCKER_WORK_DIR=/work DEVICE=RG351V ARCH=aarch64 PACKAGE=AmberELEC-emulationstation make docker-package-clean docker-package - It is also possible to build w/o docker and configure your own paths in package.mk. This will be different for every user.
- Copy binary to device - the
./emulationstationbinary found inbuild.AmberELEC-<device>.aarch64/AmberELEC-emulationstation-*/.install_pkg/usr/bin/can be copied to the device (SSH, Samba, etc) - To run via ssh, shutdown emulationstation with:
systemctl stop emustationand then run emulationstation you copied. Ex:./emulationstation
Build for x86_64 and run under Ubuntu directly
The above method is recommended due to difficulty setting up all proper files to simulate a AmberELEC device - but building ES on x86_64 may have interesting/novel uses as you can run the AmberELEC ES on a x86_64 PC/VM for testing. Requires Linux - tested on Ubuntu 20.04
git clone --recursive https://github.com/AmberELEC/emulationstationcd AmberELEC-emulationstation- Ensure you have build dependencies installed.
- Follow these directions: https://github.com/AmberELEC/emulationstation/blob/main/README.md#building
cmake -DENABLE_EMUELEC=1 -DGLES2=1 -DDISABLE_KODI=1 -DENABLE_FILEMANAGER=0 -DCEC=0 -DRG552=1 .- NOTE: set
-DRG552=1to match the specific device (RG351P,RG351V,RG351MP,RG552). **all instructions here are in reference to 552 - so you may need to watch out below too. - You can find the exact up to date options to build with here: https://github.com/AmberELEC/AmberELEC/blob/dev/packages/ui/AmberELEC-emulationstation/package.mk#L35
- NOTE: set
make -j$(nproc)- NOTE:
-j$(nproc)builds with all CPU cores, you can specify something like-j2to build with two cores or omit-j...to build with one core.
- NOTE:
- Setup AmberELEC files
- it may be possible to have emulation station look for files in your home directory, but I try and make it match AmberELEC and set home to /storage
export HOME=/storage- NOTE: You’ll need to set
HOMEeverytime you open a new terminal. It’s also possible to not set home to /storage and most files will come from the users home directory, but some things in AmberELEC are hard coded to /home.
- Ensure you have AmberELEC checked out next to AmberELEC-emulationstation (git clone https://github.com/AmberELEC/AmberELEC/ ../AmberELEC)
- Make /storage and ensure your user owns it
sudo mkdir -p /storage/.configsudo chown -R $(whoami) /storage/
echo RG552 > /storage/.config/.OS_ARCHmkdir -p /storage/.config/distribution/configs/cp ../AmberELEC/packages/AmberELEC/config/distribution/configs/distribution.conf.552 /storage/.config/distribution/configs/distribution.confmkdir -p ~/.emulationstation/-
cp -r ../AmberELEC/packages/ui/AmberELEC-emulationstation/config/* ~/.emulationstation - Setup keyboard input config
- Put this into
~/.emulationstation/es_input.cfg- FYI: you can also map this yourself in ES if you remove es_input.cfg. Controls below are:
Enter=AEscape=BSpace=StartLeft Ctl=SelectTab=XLeft Shift=Y
- FYI: you can also map this yourself in ES if you remove es_input.cfg. Controls below are:
- Put this into
- Make /storage and ensure your user owns it
- it may be possible to have emulation station look for files in your home directory, but I try and make it match AmberELEC and set home to /storage
      <?xml version="1.0"?>
      <inputList>
        <inputConfig type="keyboard" deviceName="Keyboard" deviceGUID="-1">
                <input name="a" type="key" id="13" value="1" />
                <input name="b" type="key" id="27" value="1" />
                <input name="down" type="key" id="1073741905" value="1" />
                <input name="hotkeyenable" type="key" id="1073742048" value="1" />
                <input name="left" type="key" id="1073741904" value="1" />
                <input name="right" type="key" id="1073741903" value="1" />
                <input name="select" type="key" id="1073742048" value="1" />
                <input name="start" type="key" id="32" value="1" />
                <input name="up" type="key" id="1073741906" value="1" />
                <input name="x" type="key" id="9" value="1" />
                <input name="y" type="key" id="1073742049" value="1" />
        </inputConfig>
      </inputList>
- Create some 'fake' roms.  Fee free to add your own.
  - `mkdir -p /storage/roms/snes /storage/roms/tools`
  - `touch /storage/roms/snes/test.smc /storage/roms/tools/test.sh`
- Run ES (
./emulationstation)- Example:
export HOME=/storage
./emulationstation --windowed --resolution 1920 1152 -debug
- Example: